 Save
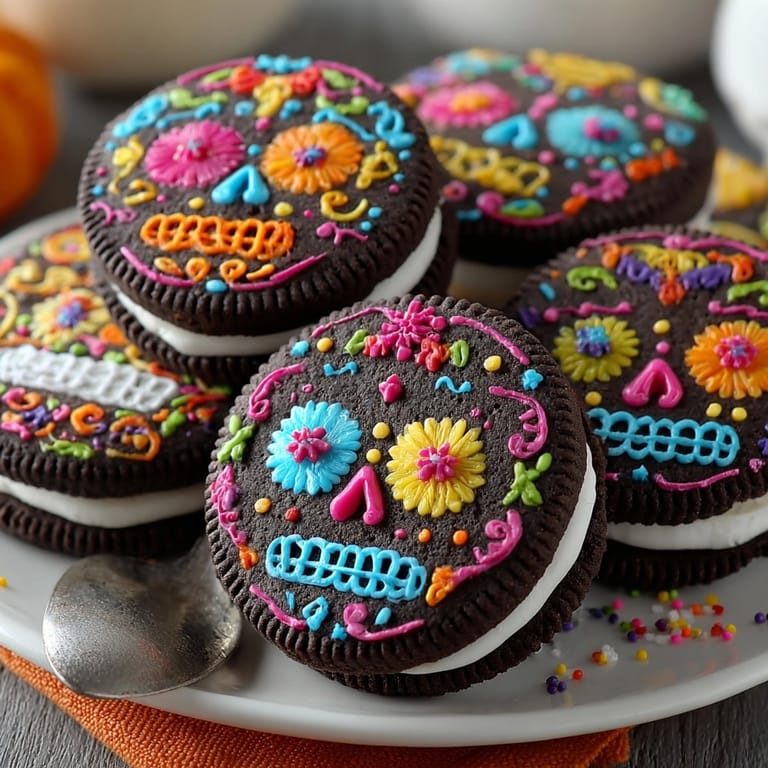
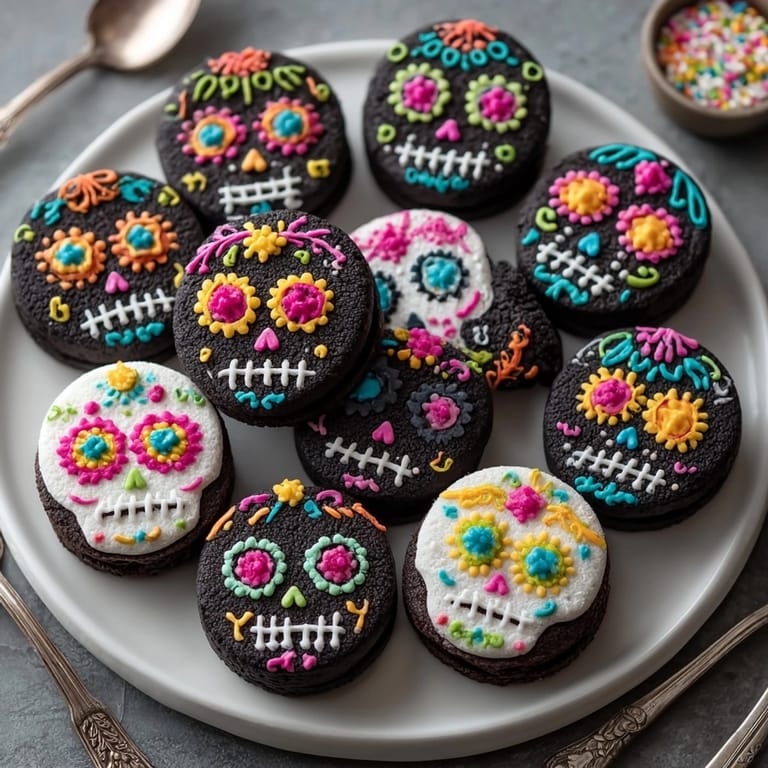
Save Sugar Skull Oreos are a playful and artistic way to bring tradition into your kitchen. These festive cookies turn classic Oreos into edible canvases letting you celebrate Día de los Muertos or Halloween with bursts of color and creativity. They are perfect for parties gifts or simply making a special treat with kids.
I remember the first time I decorated these with my nieces. Everyone's hands were sticky and sparkling with sugar by the end but we could not stop laughing and competing to create the quirkiest skull faces.
Ingredients
- Oreo cookies: You can choose regular or double stuffed types for a sturdier base and extra creaminess
- Powdered sugar: Make sure it is sifted to keep your icing smooth and lump free
- Meringue powder: This helps the icing set quickly and gives it that classic glossy finish
- Warm water: Needed to bring the icing to the perfect pipeable consistency
- Food coloring gels: Choose a bright variety for the most eye catching skulls
- Edible markers: These help add intricate facial details if you want precise lines
- Assorted sprinkles: Adds fun texture and pops of color for a lively presentation
Tired of Takeout? 🥡
Get 10 meals you can make faster than delivery arrives. Seriously.
One email. No spam. Unsubscribe anytime.
Instructions
- Prepare the Royal Icing:
- Combine powdered sugar meringue powder and warm water in a mixing bowl. Mix gently at first to bring the ingredients together then increase to medium speed. Continue mixing for about five minutes or until the icing forms stiff glossy peaks that hold their shape. If your icing seems too thick sprinkle in a few drops of water and mix again until smooth.
- Tint the Icing:
- Split the royal icing into several small bowls. Use food coloring gels to tint each portion into vibrant shades such as black blue pink yellow and green. Stir well to distribute color evenly. This creates a full palette for detailed decorating.
- Frost the Cookie Base:
- Take an Oreo and use a small offset spatula or piping bag with a round tip to spread or neatly pipe a smooth white icing layer on top of the cookie. Repeat for all cookies. Let the base layers stand uncovered for about ten to fifteen minutes so they set and are ready for more decoration.
- Decorate Sugar Skull Designs:
- Fill piping bags with the colored icings. Use fine tips or even toothpicks for drawing classic sugar skull features like round eyes upside down heart noses wide grinning smiles and bright floral or geometric motifs. Vary each design for a personalized look on every cookie.
- Add Details and Embellishments:
- Once the main icing decorations have set slightly use edible markers to add finer details such as outlines or tiny dots. For an extra festive touch press on assorted sprinkles while the icing is still tacky.
- Dry the Finished Cookies:
- Allow all decorated cookies to dry undisturbed at room temperature for at least two hours or until the royal icing is completely set and hardened. This ensures the decorations will not smudge when packaged or handled.
 Save
Save There is something magical about watching plain cookies turn into tiny works of art. My favorite part is always picking out the loudest colors for the flowers because those skulls make everyone smile at the dessert table.
Storage Tips
Keep your decorated Oreos in an airtight container at room temperature for up to seven days. If you need them to last even longer you can refrigerate but always let them come to room temp before serving to avoid any streaking from condensation. Stack layers with parchment paper in between to prevent any smashing of delicate designs.
Ingredient Substitutions
You can easily swap in gluten free or vegan sandwich cookies if needed. There are vegan meringue powder alternatives on the market or try an egg free royal icing recipe. White chocolate sanding sugar or even candy melts can replace royal icing for a shiny sweet coating on top.
Serving Suggestions
Pile your Sugar Skull Oreos on a tray surrounded by marigold petals for Día de los Muertos flair. Box them up as edible gifts for friends or party favors. They pair beautifully with mugs of Mexican hot chocolate or coffee after dinner.
Cultural and Historical Context
Sugar skulls are an iconic part of Día de los Muertos celebrations in Mexico symbolizing remembrance and the joy of honoring loved ones. They are traditionally crafted from molded sugar and hand painted—these Oreos capture that vibrant spirit in cookie form. Decorating together becomes a way to share stories and memories in the sweetest way.
 Save
Save Let your creativity run wild and have fun with every design. Sugar Skull Oreos are bound to steal the show and spark smiles at any celebration.
Cooking Guide
- → How do I achieve vibrant icing colors?
Use gel food coloring for intense, vivid shades. Mix until fully incorporated for a bright palette.
- → Can I use store-bought icing for decorating?
Yes, premade white icing works for the base. For colorful detail work, homemade royal icing is best.
- → What tools help with intricate designs?
Piping bags with fine tips, toothpicks, and edible markers provide control for detailed sugar skull motifs.
- → Are alternative cookie bases suitable?
Try white chocolate-covered Oreos for easier decorating. Any flat, sandwich-style cookie also works.
- → How long should cookies dry before serving?
Allow decorated Oreos to dry at room temperature for at least 2 hours to set the icing completely.
- → Is this treat vegetarian-friendly?
These Oreos use royal icing with meringue powder, which contains egg. Verify labels for dietary needs.